Electric Instructions -
ES5 SUPER-PRO AUTOMATIC SET-UP DIAGRAM AUTOMATIC VAKUUM BAG OR FRAME PRESS VENEERING
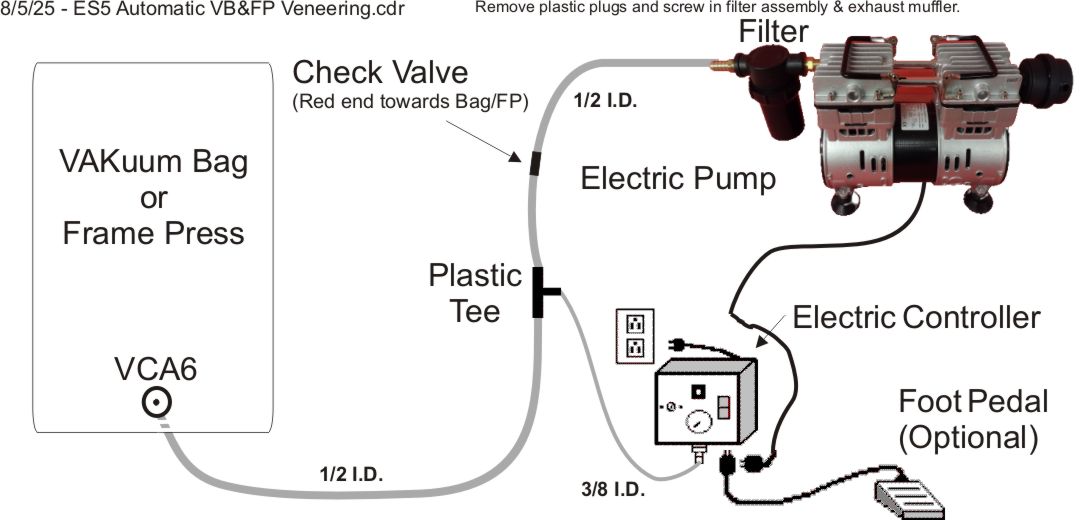
1. Place the 3 prong plug from your Electric Pump into the 3 prong receptacle on the Electric Controller.
2. Remove Plastic Insert and Screw the Filter Assembly (see diagram above) onto the pump (INTAKE) and tighten with a wrench. Do not tighten using the filter as
leverage, or as a handle since the filter may break. Also, check to make sure the filter bowl is tight. If not, remove it and re-tighten, making sure it is
on straight. If leakage is occurring in your system, this is the first place to look. Screw the muffler onto the exhaust.
3. If you purchased a complete system, a 10" length of ½" I.D. VAKuum Hose and a 5" length of 3/8" I.D. VAKuum Hose are supplied. A Plastic Tee and a Check
Valve (placed inside the longer hose) are also supplied. You must cut the larger hose (½" I.D.) to your desired length. The piece that you cut off should
now be connected to the other end of the tee, using the extra Worm Clamp supplied. The other end of this piece of hose will be slipped over the brass nipple
on the VCA6, which is the brass bulk head fitting which connects to the base board of your VAKuum Bag. Remember, when you cut this piece of hose, you must
judge what length of hose you want going from the tee to your bag. Refer to the diagram.
Once you have made the cut, you can now connect the remaining piece of ½" I.D. hose, with the check valve inside, to the filter, which is now attached to your
vacuum pump (step 2.) The red end of the check valve should be towards the tee and vacuum bag.
The 5 foot length of 3/8" I.D. hose can now be attached from the tee to the barb on your Electric Controller.
4. When at sea level the VAKuum Sensor is set to turn off at 24" Hg. and on again at approximately 20" Hg. Turn the screw counterclockwise to reduce the turn-off
point if so desired. This will be necessary if you live at higher elevations. You lose about 1" Hg for every 1000' above sea level. If you want the
maximum pressing force, and elevation is not a problem, then do not touch the vacuum sensor screw. Remember, if you turn the sensor down to shut off below
20" Hg, then the vacuum level will drop more than the original 4" Hg before the system turns back on. This drop might be as large as 7" to 9" Hg.
5. ON/OFF Switch. This is a 3 position rocker switch. When set to "VAK BAG" the unit will automatically regulate the correct vacuum level within the bag. The
"VAK KLAMP" setting will run your pump continuously.
6. Vacuum Tank. Less cycling on and off will occur if you add a vacuum tank to your system. Place it in the line between the Tee and the bag. If the bag
rips or leaks for any reason, the pump will cycle on and off excessively and the tank will reduce the cycling. Unlike the air-powered VAK Pumps, excessive
on/off cycles will damage the electric vacuum pump and void the manufacturers warranty. Excessive cycling of the pump will also cause it to over heat and
shut off, possible causing the loss of your work.
WARNING, NEVER RUN THE PUMP IN THE “VAK BAG” MODE WHEN VAKUUM KLAMPING. FOR SAFETY REASONS, THE PUMP MUST ALWAYS RUN CONTINUOUSLY WHEN VAKUUM
KLAMPING; THEREFORE, KEEP IT IN THE "VAK KLAMP" POSITION TO RUN THE PUMP CONTINUOUSLY.
74 Apsley Street Hudson, MA 01749
Phone: (978)562-4680
Fax: (978)562-4681