NU-Matic Instructions
How to assemble your NU-Matic Controller
1. Required Air Pressure
- The NU-Matic must operate between 85–100 psi.
- Do NOT exceed 100 psi. Higher pressure can damage internal components.
2. Clean, Filtered Air Is Essential
- Always supply the unit with clean, filtered air.
- If you use quick disconnect fittings, make sure the female connector is clean before attaching it.
- Picking up an air hose connector from the floor may introduce sawdust, chips, or debris into the system.
- Any contamination blown into the NU-Matic can cause performance issues or damage.
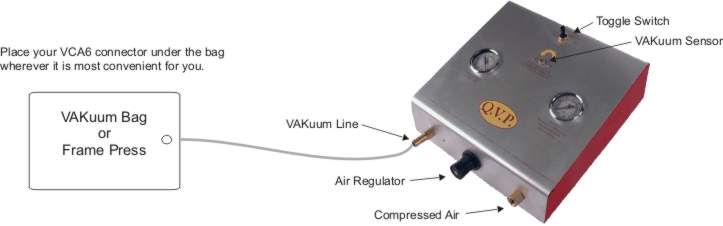
3. Understanding the Toggle Switch
- The NU-Matic has a three-position toggle switch located on the top center of the unit.
-
This switch allows you to run the pump:
A. Continuously, or
B. In regulated mode when used with a VAKuum Bag or Frame Press.
4. Setup Instructions
Step 1 – Connect the Air Supply Attach your air line to the right-side fitting (1/4" NPT).
Step 2 – Connect the Vacuum Line
- Attach the vacuum hose to the barbed fitting on the left side of the unit.
- Block the open end of the vacuum hose with your thumb.
- Flip the toggle switch to "VAK Bag" mode.
- The unit should pull vacuum up to 25" Hg and then automatically shut off.
5. Adjustments & Controls
Air Regulator (Black Knob on Front Center)
- Adjust this knob only when the unit is running.
- The air pressure gauge must read 85–100 psi while operating.
- If pressure is below 85 psi, the unit may fail to reach full vacuum and may not shut off automatically.
VAKuum Sensor Adjustment
- Brass screw located just below the toggle switch.
- Turning the sensor counter-clockwise makes the pump shut off at a lower vacuum level.
- Do not adjust this sensor unless:
A - You intentionally want lower vacuum pressure (for weaker forms), or
B - Your air supply cannot reach full vacuum.
Never hesitate to give us a call with questions. (978)562-4680
Quality VAKuum Products, Inc.
74 Apsley Street Hudson, MA 01749
Phone: (978)562-4680
Fax: (978)562-4681
74 Apsley Street Hudson, MA 01749
Phone: (978)562-4680
Fax: (978)562-4681