Basic veneering principles
Preparing Flat Surfaces for Vacuum Bagging

Here is a short video on veneering a flat panel
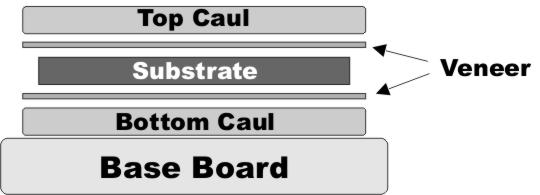
Cut the Substrate
Start by cutting your substrate (the base layer) to the finished size.
Good materials for substrates include MDF, particle board, or plywood.
If you’re using solid wood, add a cross-ply layer and let it dry unless the panel is thinner than 1/4 inch.
1. Prepare the Caul (Protective Layer)
Round off all the edges of the caul where it will touch the vacuum bag.
Make the caul slightly larger than the substrate, about 3/4 inch on all sides. Use melamine-coated particle board that’s 1/2 to 1 inch thick.
Why melamine? It’s non-porous, which prevents air from leaking and breaking the vacuum seal. It also reduces wear on the vacuum system.
For easier cleanup, lightly wax the caul to prevent excess glue from sticking.
2. Place the Veneer
Match the veneer and lay it face down on the caul.
The veneer should be slightly larger than the substrate (at least 1/8 inch overlap on all sides).
Secure the veneer with tape, but ensure the tape doesn’t touch the substrate underneath. This avoids trapping tape between layers.
3. Glue the Substrate
Apply glue to one side of the substrate.
Use regular yellow glue unless the piece will be exposed to extreme conditions like high heat (e.g., fireplace panels) or moisture.
Align the caul with the taped veneer on top of the glued substrate.
4. Secure the Assembly

Tape the entire assembly together to prevent shifting when placing it in the vacuum bag.
Preparing Curved Surfaces for Vacuum Bagging
1. Build a Strong Mold
Your mold must handle 1 ton per square foot of pressing force, so ensure it's strong enough to avoid crushing.
For curved furniture or hollow bases, make sure the inside is structurally sound to support the pressure.
2. Design for Airflow
Keep the mold convex and avoid completely sealing it.
Leave the bottom open or add slots to allow air to escape and prevent trapping.
3. Prepare the Mold and Veneer
Treat the mold as your bottom caul by waxing it to prevent glue from sticking.
Secure the bottom veneer to the mold using tape.
Apply glue to the bending ply (or substrate) and place it over the veneer.
If using multiple bending plies, glue them together only if they are flexible enough to bend inside the vacuum bag.
While evacuating the bag, you can press gently on the flexible top caul to assist alignment. Once the bag is fully evacuated, it will hold everything in place.
4. Add the Top Veneer
Place the top veneer over the glued substrate.
Tape the top caul to the assembly only at the contact points with the bottom assembly. Avoid taping all the way around, as it might restrict the plies from properly sliding into their curved position.
5. Complete the Assembly
Cover the top veneer with a plastic sheet and tape it securely.
Position the top caul (bending ply) and tape it in place.
Slide the entire assembly into the vacuum bag. Turn on the VAK pump and hold the assembly in place until the vacuum level is fully reached.
Tips for Best Results:
Test with a Dry Run: Before using glue, test-fit all pieces and simulate pulling a full vacuum. This will help you identify potential issues early.
Plan Your Timing: Know how long it will take to assemble, apply glue, and evacuate the bag to avoid running out of time.
Instructions for Vacuum Bagging Preparation
1. Always Test Before You Begin
Perform a dry run whenever trying something new, like fast-setting glue, a large item, or a new form.
This ensures that the workpiece fits properly in the bag and gives you enough time to complete the process without rushing.
2. Using a Shop Vac for Large Objects
For large items like hollow columns or boxes, use a shop vac to quickly remove most of the air.
Steps:
1. Turn on the VAK Pump.
2. Insert the shop vac at the open end of the bag. It will rapidly pull the bag tight against the workpiece.
3. Remove the shop vac nozzle and seal the bag to let the VAK Pump finish achieving the high vacuum level needed for a strong bond.
Important: Do not continuously run the shop vac in a closed system, as this can cause the motor to overheat and burn out. Running it for short periods of time is safe.
3. Ensure Strong Forms
Always make sure any form inside the bag can handle 1800 lbs/sq.ft. of pressure.
Perform a dry run to verify the form’s strength and fit.
4. Avoid Weak Contact Points
Do not use forms or veneer pieces with only two contact points on the baseboard (e.g., an inverted U-shaped piece).
Example: If a U-shaped form with insufficient contact points is vacuum-sealed, the pressure may:
Snap the baseboard due to uneven force distribution.
Stretch or burst the vacuum bag, especially under unsupported areas like arches.
Solution: Add a strong support form under open areas like arches to prevent stretching and distribute pressure evenly.
5. Protect the Bag
For sharp corners or excessive stretching, cover the workpiece with an extra sheet of vinyl to protect the bag. This double layer also extends the bag’s lifespan.
Maintenance:
Over time, bags may develop pinholes from stretching or wear. Flip the bag, plug the holes, and reinstall the VAKuum Connector Assembly.
Using the fresh, unstretched side of the bag against the baseboard helps seal pinholes.
6. Clean Excess Glue
Remove any hard glue from the bag, as it can cause punctures.
To simplify cleaning, use a removable vinyl sheet over the workpiece. This sheet protects the bag and can be easily cleaned or replaced.
7. Be Careful with Sticky Glues
Certain glues, like epoxy, polyurethane, and resorcinol, can stick to the bag.
Use wax paper or a similar barrier material to prevent glue from adhering directly to the bag.
Avoid Stress on Seams

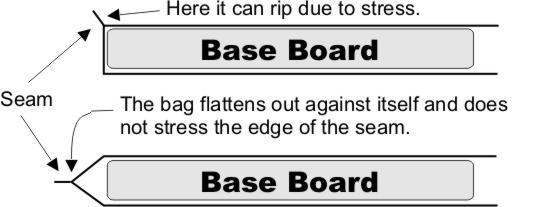
Do not pull the seam tightly against the baseboard. This can cause the material to rip at the edge of the seam (different from seam delamination).
Leave some space between the bag and baseboard so the bag can flatten out against itself without putting stress on the seam.
Key Tips for Success:
Dry Run: Always test-fit the system before applying glue or starting the vacuum.
Support Your Workpiece: Use proper supports to avoid overstretching the bag or damaging the baseboard.
Maintenance: Regularly inspect and clean the bag, and use protective layers to prolong its lifespan.
Please also feel free to call (978) 562-4680 with any technical questions.


