Vacuum Pressing Bags
Aseembly instructions for bags with baseboards
 Click for a short instructional video on how to install the vacuum bag connector
Baseboard Setup
The baseboard aka spoilboard or gridboard supports your workpiece inside the vacuum bag. Here’s what you need to know:
1. Size: The baseboard should be at least 6 inches shorter and 4 inches narrower than the vacuum bag. This allows the bag to work without stretching too much.
2. Material: Use a smooth, flat material like melamine-coated particle board that’s at least 3/4 inch thick. Avoid porous materials that might absorb glue or release gases under vacuum.
3. Kerfs: Cut shallow grooves (kerfs) into the baseboard every 6-8 inches. These help air escape evenly. Make sure to round all edges and corners to prevent bag damage. A fine-tooth saw blade is ideal for this.
Installing the vacuum bag connector VCA or VCA6
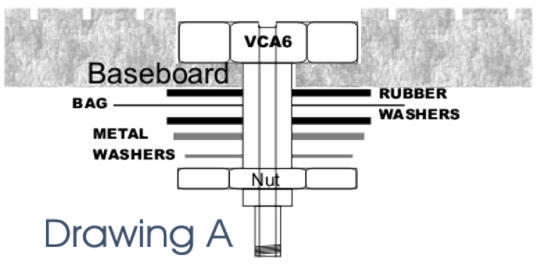
Next, a hole is needed for the VCA(6) or vacuum connector assembly. At an intersection of two channels that is at least 6“ from the edge of the bag, drill a 1-1/8” dia. hole 5/16” deep (1” dia. For VCA) Then drill a 3/4” dia. hole through the baseboard (BB) (5/8” for the VCA). Make sure the exit hole is clean and splinter free. Remove the nut, two metal washers and the rubber washers from the VCA. Push the brass piece through the BB so that the bolt head is in the recessed hole (should be slightly below the top of the baseboard). Place one of the rubber washers over the stem and snug it up to the bottom of the baseboard. See drawing A. Slide the BB into the bag, the rubber washer holds the brass stem in place.

Position the BB in the bag and cut an X, in the bag, (use a sharp knife, especially on poly bags) over the hole in the barb and then push the bag down to the rubber washer. Trim the excess bag material, do not over trim as it should
be a snug fit.
Place the other rubber washer over the stem, then the large metal washer followed by the lock washer and the nut. With one hand hold the bag to prevent it from twisting and sung up the nut. Do not over tighten.
Turn the bag/BB over and attach the pump per the assembly instructions. It is suggested that the bag be placed on cardboard or a mat to prevent it from picking up splinters.
If your workpiece does not cover the vacuum hole, place a piece of stock (3“x3”x1/2” round all edges) over the vacuum hole. This will prevent the bag from being sucked into the hole and blocking the air flow before the bag is totally evacuated.
Testing the bag
Power the pump, the vacuum gauge should read between 23 and 25“Hg (inches of mercury) when the automatic units reach’s vacuum level and shuts off. The unit will cycle on and off as it needs vacuum. If the on/off cycles are short (less than 2 minutes) and do not get longer with time, then you have a leak or you did not cover the vacuum hole.
Closing the bag

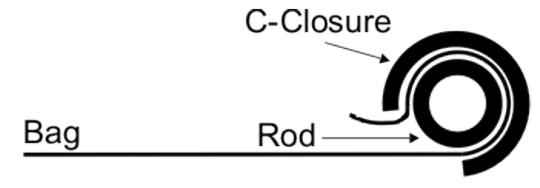
Place the plastic rod about 2“ from the open end of the bag. Fold the open end over the rod once, leaving about 1” overlap. Snap the C-Closure over the bag and rod. Sometime it will help to put spring-clamps on the closure to keep it from opening when it’s under tension. This can occur when there are large objects in the bag.
What to do if there is a leak
CHECKING THE BAG FOR LEAKS: Check all connections for loose fittings. Apply Teflon tape to the joints and tighten. Line the inside of the bag with paper. Power the system and sponge water over the bag and around
the VCA. If the paper gets wet, the leak is in that area.
Short video on how to find a leak in your vacuum bag
Checking the END CLOSURE: When the bag is closed and under vacuum, put a small amount of water in the open end of the bag. If for some reason the end closure is not tight, water will seep into the bag along the
outer edges. Placing a spring clamp on the closure at the edges or seams will normally stop the leakage. Also placing a small amount of mastic material (like silly putty) along the inside seam will also stop leakage.
General Operating Instructions
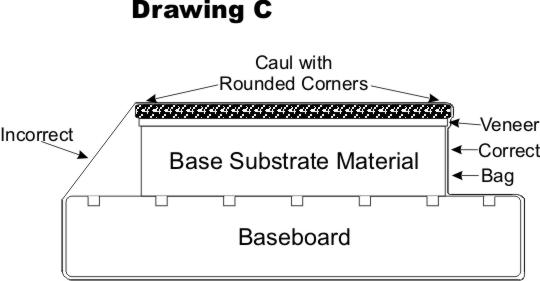
Place the workpiece inside the bag with a caul on the veneer. If you do not use a caul, protect the bag from sharp corners with cardboard or mat material.
Avoid situations where the bag will be stretched excessively as in the drawing. Reduce the size of the baseboard if necessary to allow sufficient bag material to touch the workpiece.
All hollow cylinders or large open areas must be capped or the bag will be stretched beyond it’s limits and implode.
Place the bag on a rug or cardboard to prevent it from being punctured.
Scrape the glue from the saw kerfs to keep the air channels open. Also remove the harden glue from the bag. Glue that has dried to a sharp point will puncture the bag the next time its used.
To save time and money when veneering one side, invert the workpiece so that the caul is on the baseboard. This way the caul can be larger than the workpiece. You do not have to be concerned with the
overhang as when the caul is on top. Remember to cover any sharp edges of the workpiece with cardboard to protect the bag.
Push the bag into areas where the workpiece has a hollow or undercut. The excess material will fill this area and not be stretched into a void.

For more veneering and laminating instructions check out Basic Veneering Principles
Please also feel free to call (978) 562-4680 with any technical questions.


