How to Assemble Vacuum Bags Without Baseboards
 Click for a short instructional video on how to install the vacuum bag connector.
Step 1: Prepare the Connector
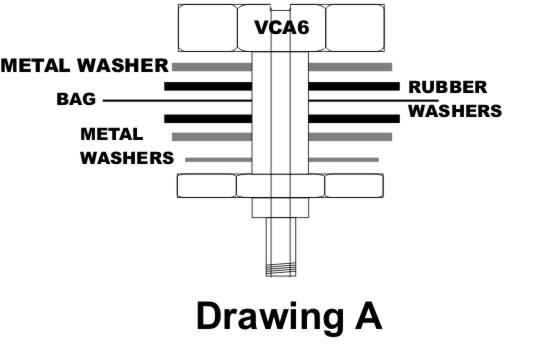
Use a VAKuum Bag Connector VCAW or VCA6W(see Drawing A for guidance).

If you don’t have a washer, you can make one from thin, smooth materials like Formica or wood. Ensure there are no sharp edges!
Step 2: Position the Connector
For long, narrow bags, place the connector about 18 inches from the end.
Make sure the connector fits against your workpiece, not the opposite side of the bag.
Step 3: Install the Connector
For the VCAW, cut a 5/8“ dia. hole or a 3/4” hole for the VCA6W at the point you want the connector located. If you put the hole in the wrong place, patch it using a vinyl pool repair kit, but be careful not to glue the bag together.
Push the connector through the bag so that the rubber washer is against the bag. Place the other rubber washer and metal washers over the connector and snug the nut tight with a wrench. Do not over tighten.
Step 4: Adjust for Bags Without Baseboards
Without a baseboard, you’ll need to ensure airflow through the bag.
Q.V.P. provides a VAK-Net in multiple sizes for even and unifrom bag evacuation.
Othering screening or net material is used inside a bag without a baseboard in order to allow the air to be evacuated from the back of the bag. The bag can seal around the connector on a smooth surface and seal itself off from the
remainder of the bag. We have recommended plastic window screen and it can be used. This netting is easier to use and remove.
The netting is expandable and can slide over a jamb or stair stringer. If your part is too wide for the net, just tape it to the top side (away from the form) of your piece. Make sure that the VCA6 (VAKuum Bag Connector) touches the
screen. Always do a dry run the first time using VAK-Net.
Addiontal Tips and Techniques
Whether doing curved staircases or round top windows, the laminates are glued up, taped, mesh is added and then put in the bag. The bag is placed over the form and clamped to hold it to the form. Vacuum is applied and
squeezes with 1800 lbs./sq.ft. of even and uniform pressure.
Always do a dry run before using new forms or glue to ensure everything fits and works properly.
Glue Recommendations
For curved pieces, use VAK-Bond 2000 glue , which:
-Has a 20-30 minute working time.
-Resists water and heat.
-Minimizes spring-back (keeps the laminate in place).
For more veneering and laminating instructions check out Basic Veneering Principles
Please also feel free to call (978) 562-4680 with any technical questions.


